Showing posts with label Cardboard Quilts. Show all posts

Monday, January 2, 2012

WIPs—Cardboard Quilts' Early Layers

M Y   A R T — I've begun the "painting and papering" phase of my next series and thought I'd post a few of the works-in-progress, or WIPs, as the kids say, lol. These are all of my "trademarked" cardboard quilt construction. The pre-cut cardboard squares are assembled in three overlapping layers for strength and texture. I'm covering these base layers with pre-printed patterned paper that was originally meant for scrapbooking. I've mentioned on this blog before that this huge book of patterned paper reminds me of those large books of wallpaper I loved to peruse as a child. These pieces will probably eventually receive top layers of vintage portraits. My typical pieces might have 7-8 layers of paper images and 10-20 layers of painted stripes and squares, all mixed with layers of polyurethane and wall joint compound. These pieces will be in the 15-25 inches high x 25-36 inches wide range.

The "theory" behind these pieces is just to show how I see things. By using pre-cut cardboard squares—culled from boxes of advance books where they're used as packing spacers—and preprinted paper, I'm using mundane everyday items. I'm using these colors and textures next to each other, on top of each other, some relating to each other, some standing proudly alone. When I view the world, I tend to see most everything as simplified colors and shapes and how they relate to the simplified colors and shapes around them. I'm always cropping sights I see—editing them, adding to them—it's just an automatic thing on my part, the way my brain works. Probably why I tend to wander around a lot, lol.

Tuesday, December 7, 2010

"Those You Can Count On"

This is one my "cardboard quilts." For these pieces I glue three layers of corrugated cardboard squares together in an alternating "brick" pattern for strength, and then mount them on a thin plywood base to install the hanging hardware. This piece, "Those You Can Count On" uses images of those people, homes and buildings that various members of my late family could always depend on, including shipmates, friends, pets and even antiques. This piece is approximately 25 x 23 inches.

Wednesday, September 8, 2010

Old Bike, Vintage Stickers, New Art

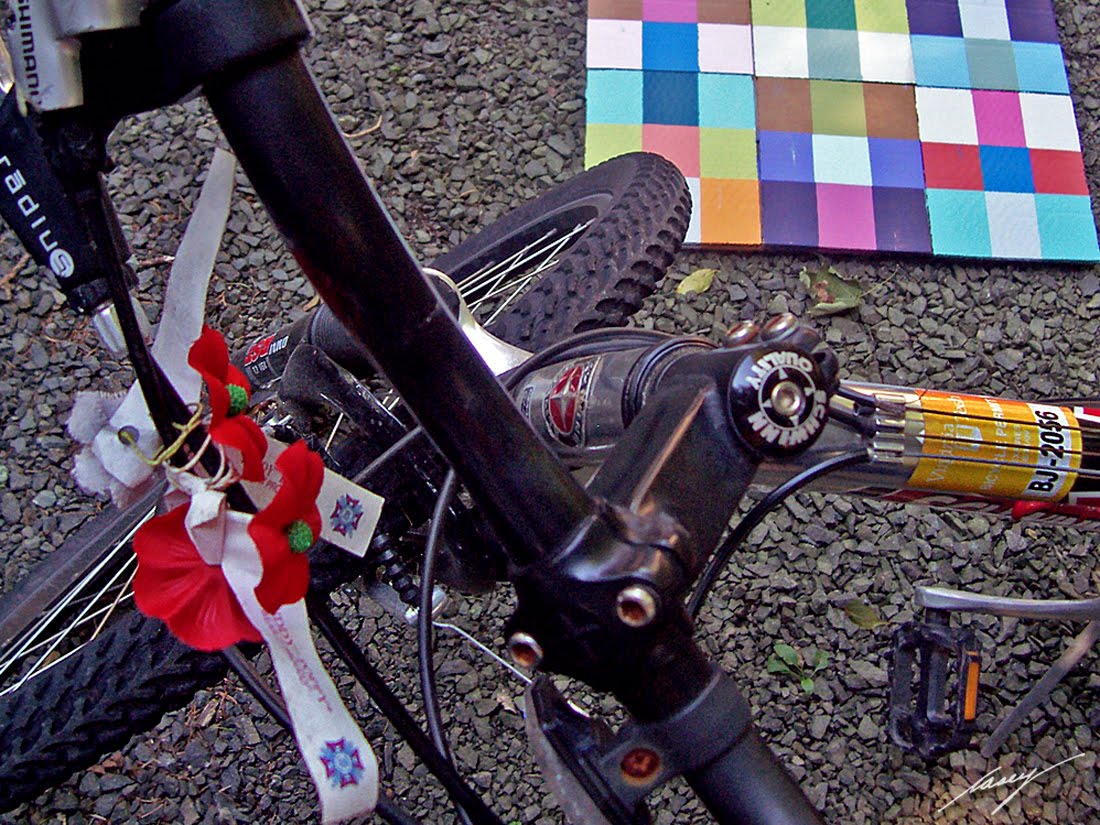
My circa 1985 Fuji racing bike, with its circa 1990-ish stickers for ACT-UP, sporting both Silence = Death and Action = Life, outside today with some of new cardboards. I must have plastered five hundred locations with these two stickers back in the day.

Not to be outdone, my lightweight, aluminum Schwinn mountain bike always has a group of Veteran's "Poppies" on its handlebars. This bike was a Thrift store purchase, and came already equipped with an orange Virginia Tech sticker on the frame (infamous college shooting site), along with an ID beginning with BJ. A little Wry with that Irony? 

Never saw a Vet in front of a store that I didn't give them a buck if I had it. Even if I only had one. It's interesting, to me, that you almost never see a veteran of WW2 anymore, and rarely the Korean Conflict. Most seem to be from the Vietnam War. Time is certainly moving on. I feel it rushing by.

The long view of the new cardboards outside today for some fresh air. These are done as far as the first layer goes, so I'm going to put them aside for a couple of weeks to cure totally before the next step. 

Tuesday, September 7, 2010

Cardboard Quilts in Progress: Newborns

I've created ten new cardboard quilts in the past few days, and I've started painting five of them. I'm probably going to use up all of my cardboard squares this time, and make as many bases as I can. I'm hoping for another ten or fifteen for twenty-five total. I get these pre-cut corregated cardboard squares from my publisher; they come in packages of books and would be recycled anyway. They save them for me so I have plenty right now. I love the look and feel of them all along the process.

These photos capture very, very early in the life of a piece of mine, consider them newborns of about 3 months old. They're alive and healthy and starting to show some personality, but they're way too happy and cheerful and bright and in-your-face. Don't worry, life will happen to them along my artistic process, lol. Right now I'm subdividing these basic squares into smaller checkerboards. Each square will be divided into four for the most part, to make the overall pattern much tighter. I think all of these might end as straight-up abstract paintings of colorwork. Well, I might add a few printed images. And definitely more detail work everywhere. This is at the end of layer one, with perhaps 25 or 30 layers to come, with a further 6-8 clear coats on top of them all, sanded down between coats of clear.

I've been working 12-15 hours a day painting and gluing cardboard together, but I'm used to juggling lots of things. All of the wood I've collected is calling my name wanting to get put together, but there are only so many hours a day...

Monday, August 16, 2010

Working with Imperfections: Cardboard Quilt #3

Nita's Little Hood Ornament—approximately 27 x 32 inches on cardboard and plywood.

M Y   A R T — This is another of my cardboard quilts, a three-layer sandwich of corrugated cardboard squares mounted on a thin plywood base.

The negative of this portrait of my young mother was very damaged. The emulsion was heavily scratched and the overall negative was faded. There was something about the sheer joy of my tiny mother sitting on a pillow on the hood of her mother's Model T that really appealed to me though. Her eyes are closed in a big smile, again, not the best face for a portrait, but it really spoke to me. After I scanned it and adjusted the highlights and shadows so that it popped more, I printed it out in a sepia version and a crisp black and white version. I cut them both into small irregular squares, and pieced the two versions together on the painted cardboard background, as I always do on my wooden pieces. The paint colors I chose for this piece, using the spectrum as I almost always do, were muted lavenders, oranges, greens, golds and blues as well as black. There are also small squares of silver leaf dotting the image, which I like to do when there is a mechanical device such as an automobile in the image. Adding a newer metallic to an image with older metal in it helps bring the piece full circle, so-to-speak.

In this piece, I wanted to emphasize the scratchiness of this image, to work WITH the imperfections, as opposed to try to cover them up. I have so many perfect antique images, that there was no reason to pretend this was one of them.  After the paper/print work was down and the painting was done, before I did any clearcoating with polyurethane or glazes, I misted the entire top layer with water. I gently pressed into the cardboard with a seasponge and kept repeating this step, misting and pressing, until the cardboard had gently 'wilted' into the corrugated layers underneath, creating a dimpled or mottled effect. I let the piece dry completely for a couple of weeks, then I lightly skimmed the surface with wall-joint compound, the same white material that contractors use on new, or repaired, walls. I let it dry and then sanded all of it off except what filled those 'dimples' on the surface. The result was a finish that worked with the original damaged image, reflecting its true nature in a way that elevated it. The newly painted portions became as gentle and as dappled as the image itself. 

I'm really happy with the way this piece turned out. A friend of my late mother, who turned 99 this year, liked it so much it's hanging in her home today.

Monday, July 5, 2010

Cardboard Quilts: Creating the Bases, Too

My Dream House Revisited, 1967 and 2007. Cardboard quilt on plywood, 32 x 24 inches. Click for the details to be seen more easily.

M Y   A R T — Cardboard quilts. Hmmm... What?

As much as I love working on wood, and I do love the look and feel of my wooden bases even before I start to work my art onto them, sometimes I do something a bit different. I like to create the base for the images out of corrugated cardboard squares. I have access to an unlimited amount of these pre-cut squares, which are used to pack books from my publisher. They are just thrown in the recycling bin, so I have some of them saved for me from time-to-time, for my own recycling, as it were. 

I lay them out in a single layer, in the size and shape I want. Then I glue in a second layer on top of the first, in an alternating, 'brick-like' construction, so that two edges are never on top of each other, to add strength. Then I replicate the first layer on top as a third layer, which again, doesn't allow two edges to lay on top of each other. Then I glue (or screw sometimes) the entire 3 layer 'sandwich' to a 1/4- or 1/2- inch plywood panel backing, slightly smaller in size than the piece so the plywood's edges don't show from the side. This further strengthens the piece and allows me to install the hanging hardware. I "allow" or encourage the pieces to warp slightly, bending either outwards at the edges to create a slightly concave piece, or the opposite way to create a slightly convex piece. I think it adds a great look to my work to not have them completely flat on a wall, like most framed piece of art one usually sees. I never frame my pieces by the way—I work the edges completely along with the rest of the art. Because of this construction method, and because my art is frequently cut up into squares and reassembled, I've come to call them cardboard quilts. 

This piece, My Dream House Revisited,  uses a drawing I started in 1967 when I was 10 years old. I drew it out completely in pencil, on thin cardboard like the back of a drawing pad, and then didn't quite finish drawing over in colored magic markers. It shows what I thought would be a great house to live in back then, a pseudo Tudor split level, with a mid-century modern 'vibe' to parts of it, including a wrought-iron fence and some evergreen trees. Instead of scanning the piece and the using the printouts, as I do usually, I actually cut up the drawing itself into squares. I reassembled those squares on the cardboard base, and then added further squares of color in both paper and paint. 

I also scored the surface, dragging a pointed dowel up and down in a grid-pattern, indenting the cardboard slightly in preparation for the next step. This step involves adding wall-joint compound to fill in the cracks between the cardboard squares, almost like grouting a tile surface, but the white compound also slightly fills in the indented gridwork. I use this grid motif a lot in my pieces by the way—as a metaphor for government and 'big brother' and all that—you know—living under the Grid and all that... 

I finished off all of this with about 10-12 coats of clear water-based polyurethane so it will never yellow—oil based polyurethanes and varnishes will amber over time—a look I've used from time to time in the past. Starting a couple of years ago though, I realized I didn't really like to leave the yellowing or ambering up to chance—if that's the look I want for a piece, I tint the paint itself. 

Back when I was doing group shows in various art leagues around here, this piece won a prize, though I can't remember exactly which one, lol. I've entered 7 juried shows and won 6 awards, including a First, a Second, a couple of Honorable Mentions, and a couple of 'Name' awards. "Name awards" are those given by a company or business, or a benefactor in the name of someone [usually dead]. Those art leagues all turned into 'who do you know,' 'what do you do' affairs though, with everyone stepping over everyone else to get noticed. After a 25 year career kissing ass in the publishing world, or trying to, it's me we're talking about, hahaha, I'll be damned if I'll do that at this point in my life. Here is this piece hanging in the 2008 Guilford Art League Fall show. I shun the 'limelight' so much that for the press photos of the winners after the reception, I turned my back and only let them shoot the back of my head, lol.


One of the last group juried shows I entered, 2008. I won something... but can't remember what.